Friday, February 5, 2016

Growing Food from Scraps

I've felt perhaps overly proud of myself in the past for not putting my food scraps in the trash, instead composting them or alternately, making stock out of my vegetable scraps and then composting them.  At some point I saw some photos on the internet of people regrowing food right out of these same scraps I had been repurposing. Sure, compost is great, but food more directly is much better. I wasn't sure how challenging it would be so I threw my scallion scraps in a little container with some soil, rocks, and water, and they've been growing surprisingly quick.

Photos:


Thursday, January 17, 2013

Extra Large Hooks & Needles

Knitting and crocheting are not things I do often. I'm generally pretty satisfied as far as winter gear goes, so most of my knitting usually happens in the form of teaching others. I crochet a small amount more, because it's way easier to do fancy things, like netting or working in the round. A few years ago I crocheted vegetable bags and  more recently I crocheted a cozy in the shape of an organ for my cup.

I pick up large knitting needles whenever I see a good price on them, because they are much easier to learn to knit with, and I find that giving a reluctant learner the supplies they'll need makes them way more enthusiastic. Crochet hooks, I don't quite have this habit -- but I *did* buy a few large ones once. You know, just in case.

I might have knit something with plastic bag yarn and those needles a while back, but I hadn't tried the hook yet.


And then, waiting for my oil to be changed, hundreds of miles away from home, I spotted this chunky yarn in a color I really like. I'd been drooling over this scarf on Purlbee, but decided to do a seed stitch a la this blanket instead. They have a whole post on a scarf modification, and if I'd read that I probably would have made my scarf a bit thinner and thereby longer, but alas. This is the first time I've successfully done a seed stitch. It was helpful to read in a comment that if you have an even number of stitches, you alternate starting your rows with knit or purl, but if you have an odd number, you always knit first. You're knitting the knit stitches and purling the purl stitches. It's like you're making dashed lines of knit.


And then finally, I was perusing Apartment Therapy's January Cure, and read their page about creating a "landing pad" in your home. They suggest having a place to dump your things when you come in the house, which I do, and having some sort of coat hooks, of which I'd ordered some recently on Etsy, and also a doormat, which I've resisted. I think I just hate how most doormats look, but I figured I'd browse Etsy and see if I liked anything.

It turned out there WERE doormats I liked, but the shipping cost put them from the "I should support other artisans" to the "I should make this myself" category.

I used cotton cord to match the look and feel of my throw rug, and the Etsy doormats in question were made from synthetic cord, so I'm going to chalk that up to the reason that I ended up spending just as much on materials. That and I bought 250 of 350 ft of cotton cord from my favorite local hardware store, Pfiel's. That's fine.

The cord I bought from Pfiel's was easier to work with for whatever reason, but I'm pretty sure I bought them out of all the 1/4" braided cotton cord they had, so I had to finish up with a more sturdy and thereby worse-for-my-purposes 1/4" braided cotton cord from a TrueValue.

It was a really quick project and I'm fairly happy with how it came out.  Hooray large hooks and needles!


Tuesday, October 16, 2012

Learning to Tat

I have been wanting to learn to tat for a long time now. I have a whole slew of old stapled booklets from around the mid 1900s with pictures and instructions, but it turns out, it is really hard to teach oneself to tat. The verb "tat" isn't even that well known. I recently found a continuing education class held at a local community college and signed myself (and my mother) up. When I told other people that we were taking a tatting class, that we were going to learn to tat, many people shared that they had visions of my mother and I wielding tattooing guns, learning to create permanent ink lines in human skin.

Tatting is a little more... delicate.


Tatting is a form of lace making that uses thread, a shuttle, knots and loops.

When I tried to teach myself, I was able to create one knotted ring, but I had no idea how to attach it to another knotted ring without ends of thread sticking everywhere. I didn't get far.

Last night I realized that there was an essential step in the process that I was missing: transferring the knot. You use the shuttle to make a knot with one thread around another, and before I was just pulling that knot snug. It turns out, you have to pull the knotted thread straight, forcing the other thread to loop / knot, and THEN pull that new knot snug. I'm pretty sure that was the main thing holding me back.


I'm not gonna lie, I found it immensely frustrating for the first hour and a half of the two hour class. A lot of the terminology was relative (under / over) and I found if I did things in the wrong order, I just ended up creating a twist, or a jacob's ladder (like when I made friendship bracelets or hair wrapping in the 90s). It actually reminds me a lot of macrame (though I mostly did it with hemp, and we called the process "hemping") and a little bit of crocheting.

I guess I get why this is more of a lost art than other handiwork -- it is super slow and entirely ornamental. However, I think it's gorgeous and now that I've got the beginning motions down, I look forward to building upon this skill in the next three classes.

Thursday, September 20, 2012

Bookbinding

I really enjoy binding books. I started with sewing together travel ephemera that I had folded in half, moved on to blank paper folded in half with a harder cover -- usually some thin cardboard or perhaps a discarded contact sheet from my photography class. Soon I figured out how to create hardbound books, and soon after that I learned the proper way of binding them. Now I bind myself sketchbooks and planners as often as I need. I like that I can customize them to suit my needs and tastes, and I also like that they don't cost me a ton of money. I made this sketchbook yesterday afternoon:


I took a few pictures of the process to share with a friend, but not as many as is necessary to fully explain binding the pages. I'm going to give a brief synopsis of that part, and I would encourage you to find a "kettle stitch" tutorial. 

Hard bound books are created with signatures. A signature is a collection of pages grouped and folded in half. Many moleskine notebooks are a single signature with rounded corners and an oilcloth cover. In thicker hardcover books, several signatures are sewn together. I'm sure they sell extra strong binding thread, but I just use regular thread that I triple or quadruple. 

You can make a cover that fits your pages, cutting down dense cardboard to a suitable size. For this sketchbook, I was reusing the covers of an old book, so I cut the paper to fit. The covers are 7.5 x 5 inches, so I cut pieces of paper 7.5x 10 inches and folded them into signatures 6 sheets (12 pages) thick. 

If I was using blank dense cardboard (chip board) for the covers, I'd cut a piece of book cloth (paper backed fabric) large enough to cover the entire thing, but as I wanted the covers to show, I only cut a narrow strip. 
Here are my bound pages, covers, extra dense cardboard (for the spine) and flowery golden strip of book cloth:

Then I cut a piece of cardboard for the spine as tall as the book and as wide as the thickness of the pages. 
I glued the spine and the covers to the book cloth:


I left a small amount of space (around 1/4") between them so that the covers can bend.

Then folded the bottom of the book cloth up and glued it to the inside. I folded the top down and glued it to the inside as well. 

I sew small strips of fabric to the spine of my book (this time I used some wrinkly bits of book cloth) and use those to glue the spine area of my pages to the cardboard spine of my book. This is probably the most important part in terms of your book not falling apart:


This is just a shot of the spine drying, there was still more to be done:

Finally I glue the end pages of my block of signatures (I usually use special or heavier paper for the outside signatures) to the covers. 

And a shot of using my sign painting supplies to hold everything in place while it dries.


And voila.


Saturday, July 14, 2012

Pruning Tomatoes


For those of you brave souls growing tomatoes right now, don't forget to prune them! Your plants will be thicker, healthier, and produce more tomatoes. 

What you want to do is pinch off any of the little suckers -- they look like new stems growing from the "armpits" of your plant. Here are some pictures to clarify:


Weeds is a Relative Term


When you're weeding your garden -- don't chuck it. Eat it!

Monday, June 11, 2012

Yogurt Making at Troy Shares / Skills

The last time I attended a Skill Share was 2007. It happened in the Albany Free School neighborhood and was followed by a vegan lunch at The Free School. My mom has ever since been trying to recreate that vegan veggie dish, and it was at Leah Penniman's Urban Gardening workshop that I first was inspired to have my own backyard hens. (My mom and I also attended Betsy Mercogliano's Bread Baking Demystified. Other workshops included Rocket Stoves, Solar Electricity, Rain Barrels, Build a Bike Trailer, Influencing City Politics, Wild Edibles, Dialogue on Oppression, Raw Foods, Wilderness Skills, and Natural Paints and Stains). There were a bunch of workshops I wanted to attend, but couldn't because they were happening simultaneously to the ones I did attend. I couldn't wait to go to Albany Skill Share 2008 or beyond. If another one happened, they did a really good job of hiding it from me.


Not too terribly long ago, Emily Rossier started a time banking system in Troy. This is similar to Ithaca Hours in Ithaca, NY. It really deserves its own post, but in short, it's an alternative system of currency in which participants earn "hours" for their services, and spend "hours" for the same. Services exchanged may include rides, physical labor, instruction, guidance, repair, cooking, and many other things. I love it because it increases the amount of people who will learn or utilize handmade methods instead of spending money on shoddily made consumables that exploit workers in other nations and due to planned obsolescence will soon be contaminating the earth in landfills.

Troy Shares recently began hosting Skill Shares on a monthly / bimonthly basis. I was sad to miss the first one, but I actually got to teach a workshop for the one that happened this past Sunday.


As it had been a while since I'd done so, I made a test batch a few nights prior. It was even easier than I'd remembered. I'm not sure it was a terribly interesting demonstration, as most of yogurt making is waiting. You wait for the milk to heat up, you wait for the milk to cool down, and then you wait for the yogurt-milk mixture to become entirely yogurt. 


Whoever brought a glass jar got to go home with their own container of yogurt-to-be. A few people had made yogurt before, and shared what they did different. The biggest difference was in the incubation period. The recipe I use calls for leaving the yogurt in a turned-off oven, or in a draft free part of your kitchen covered by a towel. Other people had used a low crock pot or a styrofoam cooler filled with bottles of warm water (if my memory serves me). 

Everyone went home with a half sheet of paper with my You Too Can Make Yogurt! on it. 

I've been eating a lot of yogurt lately, in the style of overnight oats. I mix in jam and oats and chia seeds  and let it sit in the fridge during the night. On my drive or during my first hour of work, this breakfast has given me a boost that makes me wish I was home so I could squeeze as much productivity out of it as possible. Making yogurt is much cheaper than buying it (as with everything), and considering this new breakfast habit, I should really get back on that yogurt-making train. Perhaps I'll also take a swing at making jam when the raspberries in my community garden ripen. 

Yogurt making lead to discussions about milk, and home delivery. I recounted my struggles in getting a local company to answer or return my calls, going to such lengths as chasing down a delivery truck. A woman who lives only a few miles from me offered to look into helping me realize this long abandoned dream. 

Now, I wonder if they accept food stamps. 


Sunday, June 3, 2012

Friday, February 24, 2012

Kombucha

A few years ago I was intrigued by a fermented tea in a corner store in Manhattan. It was probably $3 a bottle, but I'm a sucker for novelty, so I laid my money down. Over the past year, I more and more will splurge on a bottle when I'm looking for a boost, so much so that I decided it was time to save some money by making my own.

If you're squeamish, you might not want to read further.

Kombucha is a bubbly fermented tea. It is made using a solid mass of yeast and bacteria, known as a SCOBY, sometimes referred to as a mushroom. (The idea of mushroom tea is enough to put many people off from it. It's definitely an acquired taste, but so is beer, and beer has no shortage of fans.) It is this SCOBY that gets one started making Kombucha. The other ingredients are pretty much just tea, water, and sugar. Apparently SCOBYs multiply, but I couldn't readily locate someone who had 'babies' they were looking to get rid of in my area, so I looked to the internet for ways to make my own. I bought two bottles of GT raw organic Kombucha and tried two different methods. The first involves just pouring half of a bottle into a jar and letting it sit. I let it sit for two weeks before the SCOBY looked like the healthy examples I had seen online.


From there I steeped two bags of green tea in two liters of boiling water and added 1 1/2 cups of sugar. When the mix had cooled to room temperature (so as to not kill the live cultures), I added the Kombucha that I had grown my SCOBY in and the SCOBY itself. Then I covered it with a towel and placed it in a shady warm spot to do its thing.

The second method of growing your own mother involves a full bottle and a cup of sweet tea. It could be because there is more liquid present, but at the two week mark, the SCOBY is clear and bubbly. It smells right, but it doesn't look ready to remove yet.

I'll update this post when I progress in this experiment. I was excited and wanted to throw up what I have.

Sunday, November 13, 2011

The Lightbulb Conspiracy

I just got finished watching this video on planned obsolescence and consumerism (and waste). I thoroughly enjoyed it, and if you're at all interested in what I'm doing here with With Hands (or the reasons WHY I'm doing it), you just might appreciate it too.

Friday, July 22, 2011

Lawns are evil.

Sunday, July 17, 2011

A Book Review: The Ultimate pH Solution

The Ultimate pH Solution: Balance Your Body Chemistry to Prevent Disease and Lose WeightThe Ultimate pH Solution: Balance Your Body Chemistry to Prevent Disease and Lose Weight by Michelle Schoffro Cook

My rating: 3 of 5 stars


This book was one part hokey, one part marketing, and eight parts quality content. And I would have never picked it up if a trusted friend hadn't recommended it highly. After all, she had gotten me drinking lemon water, I should at least understand why.

I like this book because it explains how diet effects health in a body-chemistry way. Eating right to improve your health instead of popping pills is absolutely in line with With Hands!

also: SCIENCE


View all my reviews

Friday, July 1, 2011

A simple solution to a long standing problem.

This is a repost from my personal blog, but felt it relevant to share here.

My cat Igby is a bit of a bulimic. I don't think it's for any concern for her figure, and I don't think she purges intentionally. It's just that she hasn't figured out how to pace herself when eating.

When I think of it and have the time, I limit her consumption by just putting out a small amount of kibble at once. This is super annoying. I don't have a dog because they're too dependent. I needed to find a better way.

I started searchingbthe internet for automatic or cat-powered food dispensers. I was intrigued by this hamster-ball looking thing, but I didn't like the idea of a non-stationary feeding device.

On instructables I found an awesome food dispenser mod, and decided I should go out and buy the little feeding dish base and make it.

Before I got that far, however, I was struck with a far simpler idea. I often see Igby reaching her little paw underneathe some cabinet to retreive kibble she'd knocked there. If I put a bunch of food in something she couldn't get her face in, it would slow her down and solve my problem. BAM.

Jars are handy in so many ways.


Wednesday, December 29, 2010

It Wasn't Garbage.


I love this so much. A collective dedicated to repairing things instead of tossing them! So much of what ends up in the waste stream is entirely useful, and from what I can gather, the Fixers Collective isn't settling for repurposing so much as restoring to the original purpose. I want to see one of these in every town! #bigdreams

Monday, December 27, 2010

Meat Quilt

A couple years ago I found this beef chart / diagram in an old cookbook. I thought it'd be a really interesting / beautiful thing to enlarge and embroider, much like my cuts of meat napkins, but more involved, on a larger scale. This large embroidered piece could be a quilt, which would make it easier to manage, just carrying around small squares at a time. Realizing that I'm free to bring With Hands wherever I want it to go, it dawned on me to pick this project back up. I've talked about it before but I think it's important to reiterate: I think that we (westerners, really) have a huge disconnect from our food. I know myself that if I shop in an Asian grocery store, the foul and rabbit shrink-wrapped with heads still attached is really off-putting. When I was in Spain, the fact that the heads were left on the shrimp really disturbed me in a way that ripping their legs off never did. In as much as I often cook delicious meatless meals (have you tried Moosewood Cookbook's lentil mushroom walnut burgers? Sooo good.) I am a meat-eater. The way meat is sold in grocery stores across America definitely separates Food from Animal. I like things like this beef chart because they bring everything together, sort of ground our concept of food, of meat, in a sense. It's interesting when I make work about meat, I get a few different reactions, often a visceral one from the vegetarians I encounter. Thinking about where meat comes from seems to remind them why they don't eat it. Non vegetarians often comment about how they didn't know where in an animal a given cut of meat was located. I am fine with either of these reactions. I just want to reinstate the connection between food and source. Also: I really like that this chart tells the best way to cook given cuts of beef. I've ruined many a steak due to ignorance.

While working on this particular piece I've gotten a lot of questions, not so much on the imagery, but on the object itself. I don't like to make a big deal that I see With Hands as Art. I don't care if someone else sees it as Not Art, and I really don't want its artness to turn anyone away, so I typically just refer to With Hands as my project. Somehow, though, embroidering a meat quilt is just too bizarre for comprehension. I never got so much confusion when I was embroidering little animals with cuts of meat diagrams on them onto vintage cloth napkins. It seems that I need to break out the 'a' word for people to feel OK with a meat quilt. Will it be used? Most likely. Will it be art? Absolutely. It will be functional art, because I'm into that, and that is really a core value of With Hands. This is a little deeper into art theory than I had intended on getting here, but it seems that it is necessary to address. The meat quilt functioning will give it more opportunities to act as a catalyst.

Friday, December 24, 2010

What I'm Working On

After making far too many produce bags, I asked my friends Beth and Andi to show me how to do the single crochet (which my mom couldn't help me with) so that I could make a jar cozy. I recognize that such an object seems mostly for frills, and maybe it is...but to be fair, I've started using jars in lieu of travel mugs and not burning my hands would be convenient.

So begins the awkwardness that is trying to explain what I'm working on, when what I'm working on seems ridiculous. The jar cozy is a little bit easier for people to wrap their heads around than the...fingerless glove? See, the problem is, I'm not even sure what to call it, but the fact that I'm sort of just making it up is helpful when people express that they wish that they too could make whatever-sort-of-thing. "Oh, you totally could do that, because I just sort of made it up, so if you found some sort of directions you're probably better off that I am straight away."

This past weekend I took a trip to central PA to visit some friends, and before I left, I began embroidering presents for a few of them. Unfortunately, I didn't really have enough time, so I found myself embroidering while I was there. This in itself was fine, but I didn't really want them to see what I was working on until it was nearer to finished, seeing as it was for them and all. It was a different experience than my usual show and tell, but I did indeed finish everything and was able to give it before I left.

I'm not sure what it is, but there is something that for me is far more satisfying in embroidery than with knitting or crocheting. The process is somehow more enjoyable, and I think I even like talking about it more. I'll have to consider this further.

I've also picked up a sizable project I had wanted to do a few years ago, but that really deserves its own post. If you've seen me recently, and you've seen me EMBROIDERING recently, you might have an idea of what I mean by this.

*ALSO, I was subbing the other day and I had to read some first graders a book about Kwanzaa. Apparently all the gifts associated with this holiday have to be either handmade or educational. I love this, of course. Maybe I'll start celebrating Kwanzaa.... after all, they say we all came from Africa.

Friday, December 10, 2010

Crocheting

The other night I asked my mother to teach me to crochet again. She taught me when I was younger but I couldn't get the tension right and gave up pretty easy. I can't actually knit in the round, and it seems that with crocheting, doing circular things is no issue at all. I had seen a couple things on the internet recently that I wanted to make that required crocheting. I've been working on one of them, which is actually a pretty quick project. A crocheted produce bag, which I think is a cool thing to work on, because not only does it reduce waste and keep my hands busy (which helps me focus), it also provides a catalyst for conversation about (obviously) the handmade as well as that of waste.


I deviated a bit from the pattern. Here's the link of my inspiration.
I previously had been knitting the mate for this fingerless glove, which I made many years ago and didn't even remember I hadn't completed the other until I went to wear it. It's somehow more difficult to explain what I'm working on when I'm knitting this, but people generally guess the terms right when I'm doing it.


Let's be straight here. People always ask: "are you knitting?" whether I'm embroidering, crocheting, tatting, or actually knitting. I feel like knitting is seen as more of a catch-all term than it actually is.

Thursday, November 11, 2010

Fresh Cuts


I absolutely love instructional things like this. A chicken one, too!

Tuesday, November 24, 2009

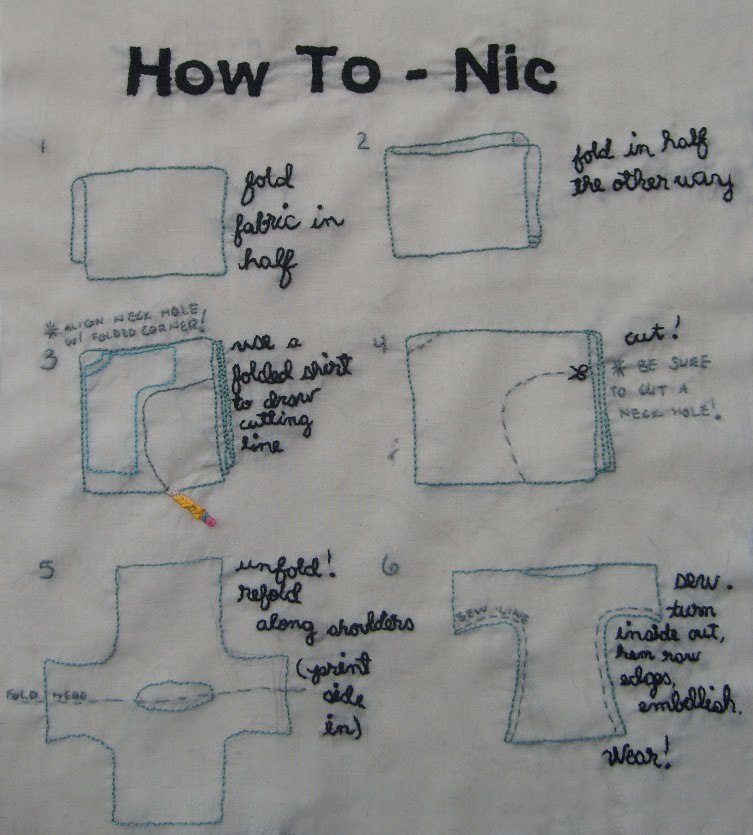
How To-Nic

The How To-Nic (How to- Tunic) will soon be for sale on chateauofadoubt.etsy.com. For now, check out the illustration:

Monday, November 23, 2009

With Hands Book

The With Hands book is complete. You can pick up a physical copy at the Chateau of a Doubt booth at the Tight Knit craft fair on black Friday, or if you don't feel so inclined, you can have a free digital copy.